Network camera

You can add a network camera by pressing the button in detail.

Add a camera
Search UPnP / ONVIF IP Camera and add You can discover and add devices on the same network.
 Select and add the discovered camera (multiple choices available)

Add Manual
 Press the Add button and enter it manually.

Select a model, enter a user, password
Select a model for that camera.
 If no matching model exists, you can try connecting with ONVIF.
 Enter the user (ID) and password, then click Connect and Check Input to perform a connection test on the camera.

 When the scan is complete, the status area displays the results Multiple channels can display multiple videos.
If the number of videos is not displayed and other messages are displayed, it is necessary to check the model, address, user, password, camera abnormality, etc.
Verifying the connection profile
Click the Advanced Settings toggle at the bottom right to open the Advanced Settings

 Configure dynamic profiles to be enabled.
Open Web Browser

Connect and check input button Press the right web browser button to access the camera web page.
Ping

You can ping the camera IP with the right ping button for connection and input count check.
Stream reception method

You can set the camera stream reception method.
The default is always, and changes are received when a camera stream is needed (recording, live-viewing, network streaming, etc.).
Export / Import
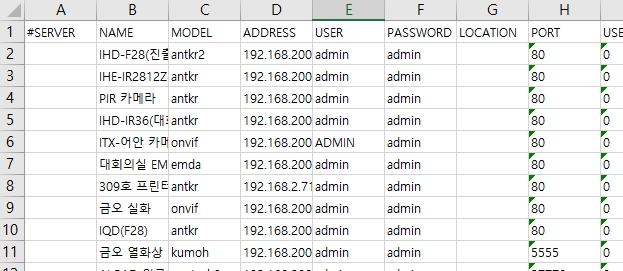
You can export or import a list of network cameras in xlsx format.
After connecting to USB, click Export to save the current camera list.


You can add/modify network cameras by importing them in the specified xlsx format. Please refer to the sample file below. If the network camera is changed through import, it is necessary to update the information by checking the connection and input number.
The #SERVER entry indicates the server number of the NVR+/VMS
Last updated
Was this helpful?